Pages

335 113-7 shunting at Muhldorf Depot

Showing posts with label HO model railways. Show all posts

Monday, 24 February 2014

Bahnland Bayern - Hidden sidings

The track plan for my Bavarian HO layout was largely frozen in the middle of 2013 and subsequently all the track laid, point motors and decoders fitted and tested. This has given the chance to get to grips with the 'finished' operation of the layout, and start to see what does and doesn't work. The one outcome of the testing was the lack of a real yard for the shunting and forming of freight trains. As there was no space within the built layout or in fact the room it's in, there was only one way to go; outwards. Next door to the room the Bavarian railway is in is an outbuilding that largely contained parts of layout and offcuts of wood. A few trips to the 'municipal recycling center' (tip) and a lick of paint and some extra space was available. There was the small matter of the available space being on the other side of a wall and/or window, but this was not insurmountable. The center pane of the window was replaced with a thick sheet of wood with a suitable slot cut to allow access between the two rooms. A sliding hatch was fitted to prevent drafts in the winter. Track has now been laid, and with a pair of DCC Telex remote coupling fitted locos, three addditional sidings have been added to the yard situated on the station approach, bringing the total to five sidings and a headshunt; enough for plenty of operational flexibility. The hidden sidings will be accessed between some low relief industrial buildings on the layout side. I am also giving some though to a remote camera so the sidings can be viewed from the control area, although having walkabout handheld controller should mean this is a nice to have rather than a necessity.


Wednesday, 22 January 2014

ACME E-lok Baureihe 120 141-7 DB - Epoche VI

Hot on the heels of  the latest Brawa Voith Gravita 10BB which arrived last week from The Hobby Store in Faversham www.hobb-e-mail.com/,  their latest HO arrival in the form of the long awaited DB E-lok Baureihe 120 141-7 in the current DB Traffic Red livery, pre-fitted with Loksound decoder was picked up from the shop today, and I've taken some photos to give a flavour of what to expect from this premium release...


The packaging is superb, very similar to the excellent boxes that ESU ship their premium locos in, complete with a solid plastic base to which the loco is bolted, an allen-key is provided for release. This is a further improvement in loco packaging and would be suitable for transporting in future, given the very fine detail these models are now coming with as standard.


First impression are, it was worth the wait, ACME have really captured the beautiful simplicity of the BR 120 well, all angles look spot on, with the all important 'face' particularly pleasing. The decoder is the standard ESU Loksound we've come to know as fitted to both ESU and Roco offerings of late complete with the usual array of sounds including platform announcements, door closing and the various compressors and brake sounds of the loco itself. Performance is superb, as should be expected from a loco in this price bracket, with the third headlight and cablights independently switchable. The pantograph is an excellent representation of the prototype, and is not cursed with an over-firm spring so rides the catenary well without exerting undue forces. All in all I cannot fault this, and it scores a perfect 10.


Monday, 20 January 2014

BRAWA - Voith Gravita 10 BB, DB BR 261 Review


The latest Brawa Voith Gravita 10BB arrived from The Hobby Store in Faversham
www.hobb-e-mail.com/‎ late last week, and I managed to spend a few hours at the weekend getting to know it better... 


I managed to get hold of the DB Traffic red livery as 261 061-6, which sold out almost instantly on all the German model railway shop websites. Which goes to show sometimes there are advantages modelling a minority interest subject area in the UK, as even though both DB livery models are sold out at Brawa and in Europe, a small specialist shop in Kent had two...

First thoughts on removing from the well packed box (similar to the latest Bachmann boxes and far better than Roco's impossible to access polystyrene efforts), is that this is a beautifully detailed model, albeit I imagine rather fragile due to the plethora of tiny parts. To confirm my suspicion, there were two of the cab roof mounted radio masts missing. On a close inspection of the area where I unpacked to loco, one was located in the box, whilst for the other I've fabricated a replacement using various thicknesses of plasticard which is undetectable. One of the bonnet catches was also missing, and again I fabricated a replacement. The walkway handrails and side walkway guards are glued into the metal chassis with very short pegs, and one was partly lose, this was  refitted using a tiny amount of CA on a scalpel blade.

Now, onto the difficult part, actually getting in to the b*gger.

Now, I have previous with Brawa models, as I have a number of both their N and HO models and some are easier to access to fit decoders than others. Most notably I destroyed a BR 203 trying to fit a decoder on N...

The N-gauge Brawa Gravita was actually a doddle, being that the metal chassis was screwed to the bodyshell, but not the HO, no, that would be too obvious. Instead a series of fiddly clips which you cannot see, and are scared to force allow both bonnets to be slid off. Now this must also be done whilst avoiding shearing off the bonnet handrails and walkways, cab roof details or buffer beam parts. easier said than done.

Once slid forwards the bonnets pull upwards and off. Once this has been achieved, it does seem to be a little easier now they've both been on and off a few times. The decoder is a 21 pin drop in which is easy once you've actually got to it.

As I only had an el-cheapo Bachmann decoder to hand, this was used to test the loco, and before tweaking the CVs it is a little jerky at start up, but I'm going to fit my preferred decoder, ESU lok-pilot later. 

Fitted Lighting

My good god it's bright. Five LEDs heads at each end four on the buffer beam handrails and one on the cab nose they are like mini floodlights. The tails are similarly bright. Unfortunately in taking the bonnets on and off I managed to dislodge  one of the bonnet lights but on closer inspection it had simply been misaligned with the bonnet lens. The Gravita is also fitted with an independent cab light (Fn 2) and detailed cab interior which is nice.


All in all, this is a new model that looks great, runs well and is very detailed (which is a bit of a double edged sword). My personal advice would be to suggest only buying this model in the flesh to ensure the tiny weeny easily knock-off-able bits are all present and correct. In summary  9/10, (loses a mark for being a pain to get into...)


Thursday, 19 December 2013

Bahnland Bayern - December Update

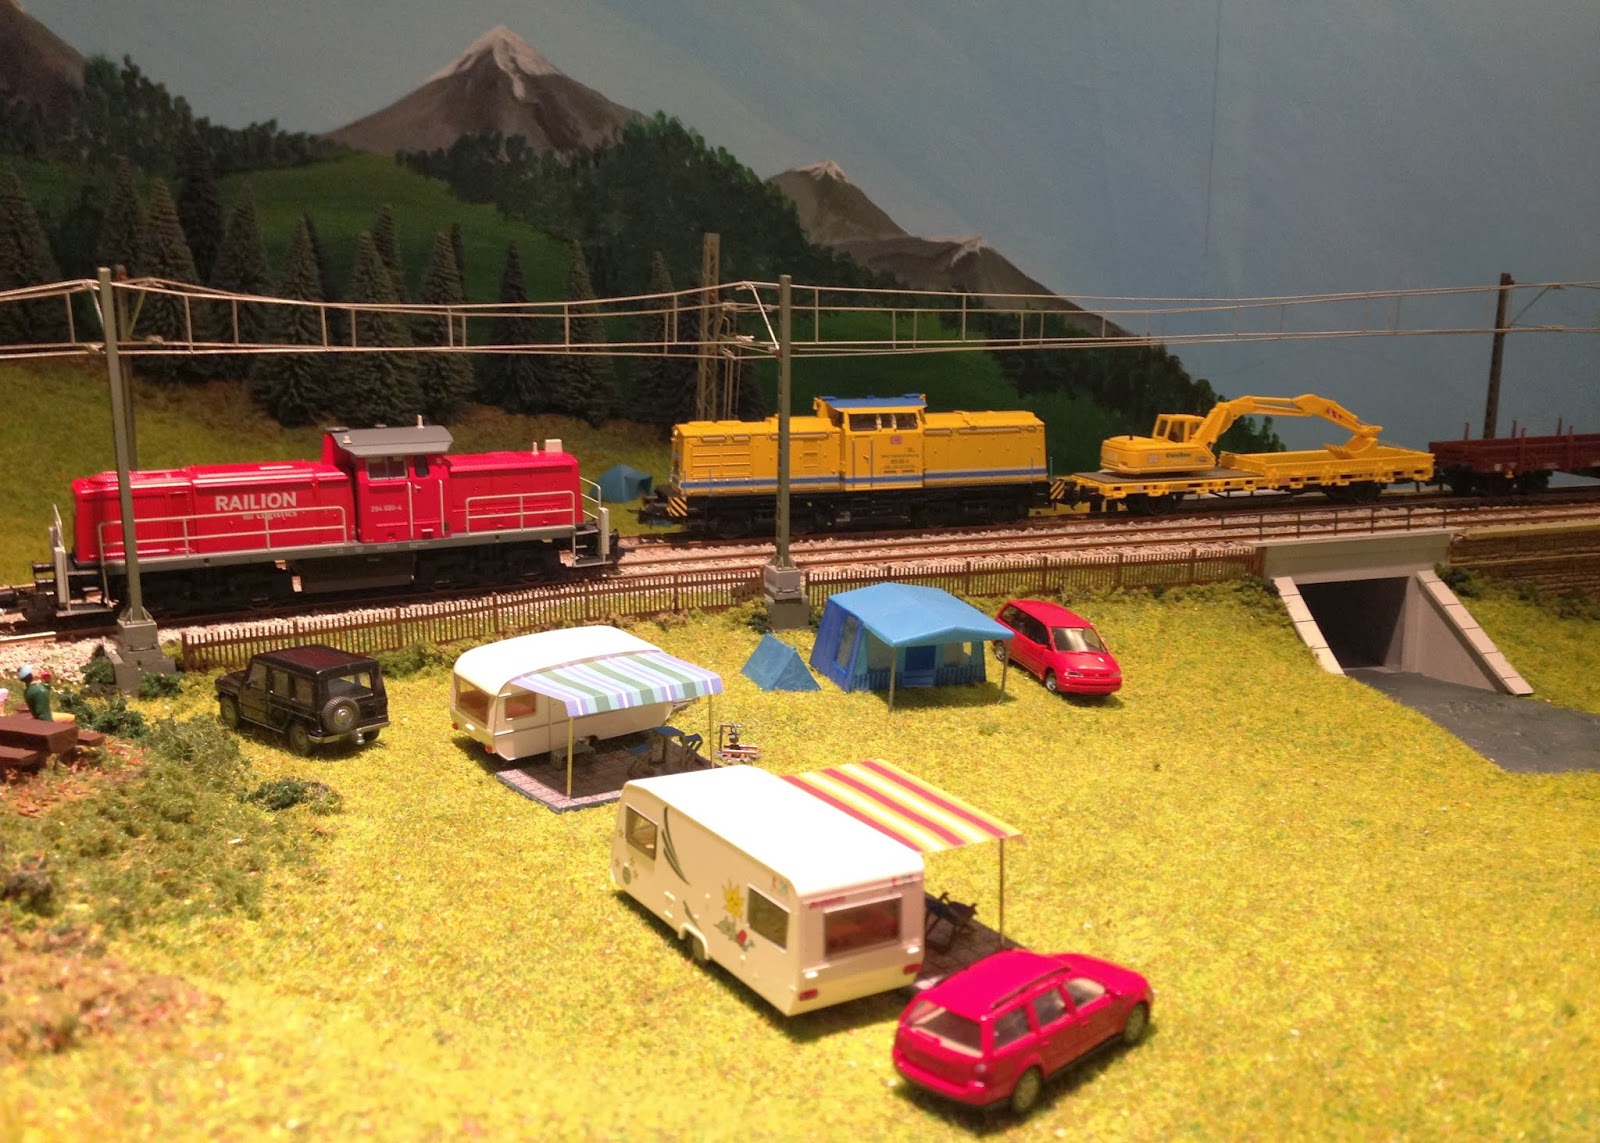
Some more progress to update on the Bavarian HO layout; the overhead catenary (by Viessmann) has been installed over the rive bridge and towards the eastern end on the first large scenic board. The campsite at the 'country' end of the layout is largely complete, just some hedging to fit between the caravan pitches. I've now begun the main Bavarian riverside tavern, on the eastern bank of the river. I'm also planning a small loco fuelling point to the rear of where the two electric locos are stabled to the rear of the second photo.


Sunday, 17 November 2013

Bahnland Bayern in HO

Some more progress shots, apologies for the poor lighting, these were just taken with my iPhone once modelling had finished for the day to record the days activities. The basic elements for the Bavarian scene are all pretty much there; the Schloss, complete with beer garden, the Black forest imbiss & bier chalet, and the mountains.

I've also begun to install the overhead catenary, this time I'm going for Veissmann, rather than Sommerfeldt as the masts are more accurate for the region and era I'm modelling. Many more to be fitted before I'm done.

Compare the second photo with one taken from roughly the same angle just over a year ago and the progress is quite dramatic.

Tuesday, 15 October 2013

Making tracks...

A concerted push this autumn has resulted in some great progress on my German HO scale layout. All the trackwork is laid, point motors fitted and decoders added and it has all been tested. With this major hurdle cleared the basic structure of the scenery can be formed. Apologies for the slightly rough and ready nature of the landscape, these photos basically show an equivalent to a first draft or sketch, so that changes can be made. Buildings and structures are just roughly placed before being properly bedded in once a satisfactory position is achieved.


These photos show the far left end, roughly a quarter of the scenic element of the layout, where the mainline enters from an alpine valley before crossing a river valley. The first tress have been placed to gain an idea of scale and perspective, many hundreds more to be added.

Monday, 1 July 2013

Brief European layout update

A lot of work has taken place on my main European layout in the last few months, but much has not been particularly worthy of photography, such as wiring and fitting point motors and point decoders. The main work has been in what will become the station, with the through lines and two bays now laid, and the pointwork for the station throat largely complete.Further time was spent reworking the baseboards, hopefully for the last time, particularly in the station approach area, allowing more space for the 'frontscene' (as opposed to a backscene) as I am  keen to see the trains running through a town-scape on the approach to the station, rather than all the railway infrastructure in the foreground. I've also widened the station itself to allow a few carriage sidings to be laid in front of the column that will by necessity have to act as a scenic break roughly two-thirds of the way along the station. As a consequence of this compromise which results from the structural challenges of building a large layout in a cellar, I will only be modelling part of the station, the through platforms will allow a loco and up to 5-6 coaches to appear from off scene, into the station, while the rest is still in the fiddle yard. The front bay platform end in a blind tunnel to allow five coaches and a loco to be accommodated.

All pointwork on the visible part of the layout is the latest Tillig Elite code 83, which in my opinion is the finest ready to run track available, and once ballasted and weathered is close to handlaid in both look and performance. It also has the advantage of being quite flexible so can be laid with some curves to avoid the jointed look that ready-made points can suffer from.

The main lines are laid with Roco Code 83 concrete sleepered flexi-track, which has a finer sleeper profile than most other proprietary HO track, whilst the sidings are to be Tillig elite, which matches the turnouts.

The point motors are generally DCC Concepts Cobalt, which seem to be better put together these days. I had quite a lot of issues with some of the early batches I used on Widnes Road, and they were replaced by the more robust but far chunkier Tortoise motors for exhibition use, after two cobalts failed at an exhibition.

The motors are wired from the outset for full DCC operation, this being accomplished with NCE 'Switch-8's' which are a very cost-effective solution to turnout conversion.   

I've also made the most of the fine weather to start on detailing and renumbering stock, the first completed is a pair of 111's in Bavarian advertising livery. These are the recent Roco models, with full buffer beam detailing fitted and painted, and they are now awaiting some light weathering.


Sunday, 21 October 2012

European Layout - Update

I had originally planned to spend this weekend adding DCC turnout decoders to Widnes Road, which would have meant dragging it all upstairs from the dungeon and setting up in the dining room in order to wire the boards up to test the installation.  

I tested the first decoder before committing to rewiring the whole layout, and lo and behold, a DCC 'funny' occurred. It worked OK on my old ZTC system, but the much newer ECoS would not recognise the decoder (an NCE Switch-it). 

Much head-scratching and consultation the internet later and I was not much further forward, so abandoned that idea while I waited on the font of much of this black art, Kevin from Coastal DCC to get back to me. So instead, I roped Alice, my better half, into helping (well, more accurately, do-ing) the emerging scenery on my permanent HO European layout.

It turned out that the decoder issue is a clash with Railcom on an earlier firmware installed on the ECoS, and it all works fine now, but by then it was too late to put Widnes Road up and it can wait until another weekend. As it is, really good progress has been made with the base layer of scenery; namely the river bed, and hills which form a scenic break between the layout and fiddle yard.


The grey area next to the river wall is where the large pub will go, with beer garden on both sides of the railway line. On the other side of the river will be a camp site, running up the hillside.


Tuesday, 28 April 2009

'Muizen' Progress - The first tracklaying

Another weekend of successful woodworking and I've been able to get the first track down, at least in 'first draft'. It's to give me an idea of whether I can keep to my plan of a minimum radii of 30-36" even on the off-scene parts; and initial tests are hopeful. Although it's not too clear in the picture all track will be laid with prototypical super-elevation or 'cant'.

I've already rebuilt the 'removable' section by the door to ease the track radii from 28" to a generous 36", and to ensure that where the track joins the main baseboard from the 'bridge' it does so perpendicularly to allow for a reliable rail joint.

The second photo shows the main off-scene area; this allows a continuous run to be achieved and also accommodates a 4-road fiddle yard for up to 6/7 coach trains plus locos, this will be laid as far as the wall in the distance. The four tracks to the right of the picture are placed to gauge the depth needed for a useable storage yard; this quarter of the layout will not be modelled.

All track is the HO-Elite system from Tillig, obtained from international models in Wales, who provide an excellent range and great, friendly service. I consider the Tillig track a good compromise for a layout that doesn't leave home. Whilst my exhibition layout Widnes Road has only hand-build turnouts, for something of the size I'm planning for Muizen I felt it really was a bit of a tall order, plus would have slowed progress by 6-12 months. The Tillig track once ballasted and weathered, and fitted with slow action Tortoise or Fulgerex point motors can look nearly as good and has all the excellent slow-running characteristics of live-frog continuous point blade turnouts.

The final shot shows the layout in context in the main basement railway room (Widnes Road has it's own room!) It really is starting to dwarf Singen Hbf, but the design allows for either layout to be operated independantly, and the central layout is easily moveable if extra room is needed at one side of the room for modelling. Next task is to get the windows in the room replaced and then the main baseboards along the longest wall can be built, and a continuous run laid.


Thursday, 16 April 2009

Easter Woodworking

The Easter break gave me a few clear days to make progress on my new permanent layout. The main structural frame is taking shape with three sides of the room now having the principal wooden sub-structure in place.

The top deck is only on temporarily until the track plan is finalised at which point the track bed will be cut out allowing the rest of the scenery to be built using the open frame structural system.

The track in the foreground of the top picture is heading across the 'bridge' section which links up the complete loop and can be lifted off to allow large items (like the boards of Singen Hbf seen in the background) to be removed from the room. It is mounted on a series of pattern makers dowels which are set into the ledge on either side baseboard. I have yet to devise the system which will allow the OHLE system to cross the bridge. I'm working on it...

In the rear of the 1st photo you can just make out the structural steel work which has been fitted into the wall to allow the double-track mainline to pass through a retaining block-work wall. This was quite a daunting task but the track plan would have never worked out without it. The steel was supplied by metalsdirectuk and was supplied ready cut and finished, a top drawer service.


Sunday, 15 March 2009

A weekend of woodwork.

Inspired by the layout that Nigel Burkin has under construction at: http://nigelburkin.wordpress.com/ I've made a start on the baseboards for my latest layout. Unlike my last two, this one is a 'layout that doesn't leave home'; mainly as it will have extensive OHLE, and frankly to model overhead line equipment convincingly it isn't too compatible with portability IMHO. I've started with the easiest section; the narrow return along the door-side of the room; a run of around 11 feet; with a minimum board width of 15 inches; widening at both ends for the corners. I am planning to use a minimum radii of around 3', but hopefully well disguised by either scenery or completely 'off'scene'.

Excuse the Roco NS 1800; it's simply to give sense of scale. I've gone for a completely wall-mounted construction for the narrow 15" wide 'returns', but the main section; at some 13' x 2'6" will need at least some additonal support.